 Saturday, April 20, 2024
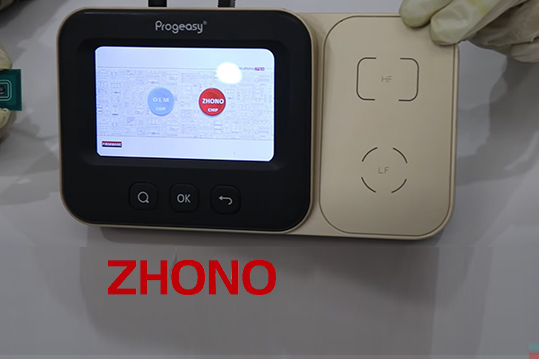
Zhono Instructs Resetting and Rewriting the Xerox 286 Series OEM Chips with Progeasy
Zhono Instructs Resetting and Rewriting the Xerox 286 Series OEM Chips with Progeasy
According to Zhono, Progeasy can reset and rewrite many of the OEM chips for the Xerox 286 series.
A selection of these models is shown in the table in Figure 1. For a more detailed selection of the models available for resetting and rewriting, please contact your sales representative or leave a comment.
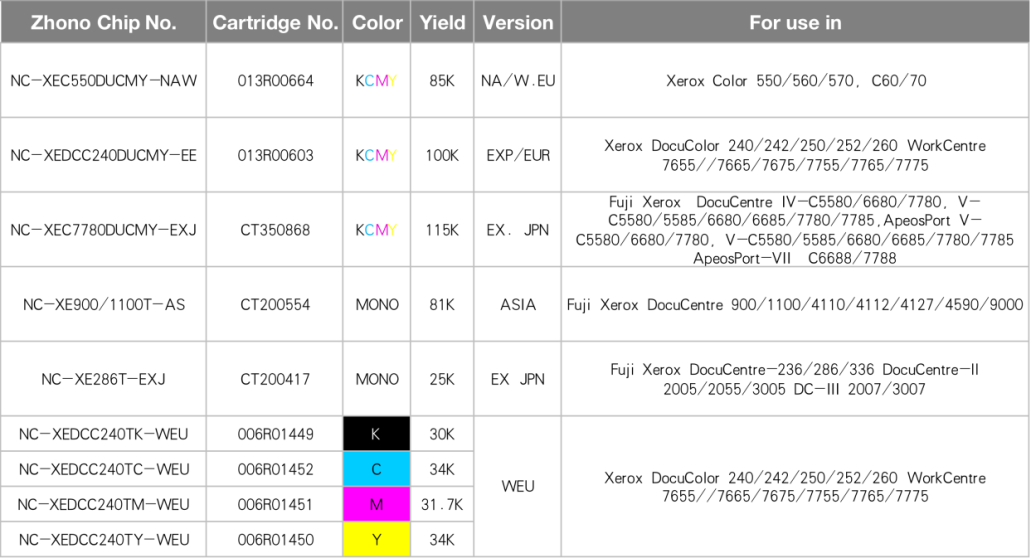
Figure 1
This video consists of three parts:
Part Ⅰ: Identifying the chips.
Part Ⅱ: Resetting/rewriting the chips.
Part Ⅲ: Verifying that the chip has been reset/rewritten successfully.
Part Ⅰ: Identifying the chips.
First, press the power button for a few seconds to turn on the Progeasy chip resetter. It will take a few seconds.
Second, insert the corresponding USB dongle and click the [FIRMWARE] icon. You will see that there are 255 credits left for resetting/rewriting this Xerox 286 series chip as noted on the screen.
Click the [Return] button, and then click the [Search] button to enter the chip identification interface. Put the Xerox 286 series OEM chip on the HF area and click the [Search] button. You can see detailed information regarding this chip on the screen.
Part Ⅱ: Resetting/rewriting the chips.
Put the Xerox 286 series OEM chip on the HF area and click the [Return] button twice to return to the main interface. Then click the [OEM CHIP] icon and choose the model you want to rewrite or reset. The default mode is ‘manual’ on the resetter. To turn on the ‘automatic’ reset mode, click the [Auto Mode] icon on the top right corner. When the check mark turns green, it means the resetter has entered the automatic reset mode. You can see the prompt “Resetting” and the corresponding information on the screen. When the message “Success!” displays on the screen, it indicates that the chip has been reset/rewritten successfully. One credit is deducted, and the remaining credits decrease from 255 to 254.
Part Ⅲ: Verifying that the chip was reset/rewritten successfully.
Pick up the chip from the HF area and put it back. When the message “New chip” pops up on the screen and no credit is deducted, it indicates that your chip was successfully reset/rewritten.
Notes:
- One credit point will be deducted each time a chip has been reset/rewritten.
- If the prompt “New Chip” pops up on the screen, it indicates that the chip was reset/rewritten, and no credit will be deducted at this point.
- To identify, reset or rewrite the Xerox 286 series OEM chips, you must use the corresponding 286 series USB dongle from Zhono.
- You can reset/rewrite the same Xerox 286 chip up to eight times.
- To avoid a chip not being recognized by the copier after it has been reset, please refer to the following two methods:
Method 1: Use the chip which has been reset or rewritten in another copier of the same model.
Method 2: Initially use another Xerox 286 chip (either a used chip or a new one) in the same copier. Only after the chip expires and can no longer be used, you start to use the reset or rewritten chip in the same copier.
Related:
- Zhono Instructs How to Downgrade the Firmware Version for the HP CF500 Series Color Printers
- Zhono Warns Problems May Occur If the Brother 770 Series Chips with Batteries are Handled Incorrectly
- Zhono Expands Distribution in Italy
- Zhono Releases Compatible Chips for Brother Printers
- Zhono Successfully Solves HPs Latest Firmware Upgrade
Comment:
Please leave your comments below for the story “Zhono Instructs Resetting and Rewriting the Xerox 286 Series OEM Chips with Progeasy.”

Leave a Comment
Want to join the discussion?Feel free to contribute!